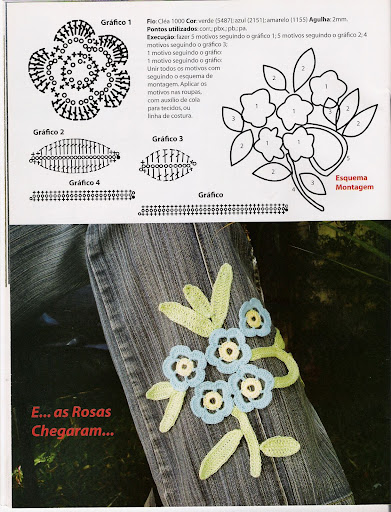
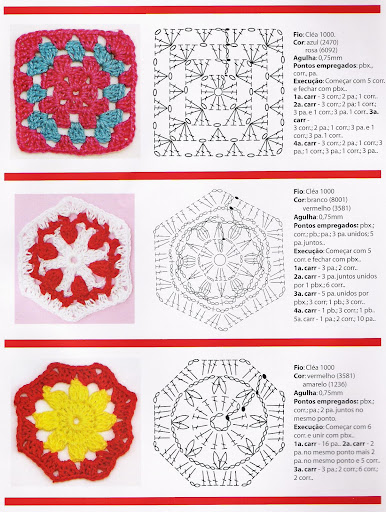
شوفوا فكرة هالشنطه كيف حلوة وبسيطه يارب تعجبكم ........ نقلتها من موقع اجنبي

Combine simple geometric shapes with lacy motifs to make this cute tree tote. Vary the color, weight, and texture of the yarn you choose and you’ll create your own magical forest. These appliqués would also look cute on the hem of a skirt!
Skill Level:
Easy
Finished measurements:
The Small Flower
Tree Top measures 2L" (6.5cm) in diameter; the Trunk measures 3H" (9cm) long and L" (1.5cm) wide. The Large Flower Tree Top measures 4G" (11cm) in diameter; the Trunk measures 5G" (13.5cm) long and L" (1.5cm) wide.
Materials:
1 skein each: Brown Sheep Cotton Fleece, 80% cotton, 20% merino wool, 215 yd (197m), 3H oz (100g), #380 Dusty Sage (A), #365 Peridot (B), #455 Willow Leaf (C), #460 Jungle Green (D), and0 #825 1Truffle2 (E)
Size F-5 (3.75mm) crochet hook, or size to obtain gauge.
Tote bag to embellish (at least 14" [35.5cm] x 14H" [37cm], excluding handle)
Hand-sewing needle
Sewing threads to match yarns
Gauge:
Although gauge is not critical for this project, you can refer to finished measurements for tree parts. Each piece works up as quickly as a gauge swatch.
Special Stitch:
PICOT Ch 3, sc in 3rd ch from hook.
Large Flower Tree:
Tree Top
With yarn D, make a magic ring.
Round 1 (RS) Ch 3 (counts as dc here and throughout), 9 dc in ring, sl st in beginning ch to join—10 dc.
Round 2 Ch 3, dc in first dc, 2 dc in each remaining dc of round, sl st in beginning ch to join—20 dc.
Round 3 Ch 3, *2 dc in next dc, dc in next dc; repeat from * around, ending with 2 dc in last dc, sl st in beginning ch to join—30 dc.
Round 4 Ch 3, dc in next dc, *2 dc in next dc, dc in each of next 2 dc; repeat from * around, ending with 2 dc in last dc, sl st in beginning ch to join—40 dc.
Round 5 Ch 3, dc in each of next 2 dc, *2 dc in next dc, dc in each of next 3 dc; repeat from * around, ending with 2 dc in last dc, sl st in beginning ch to join—50 dc.
Fasten off and weave in the ends.
Tree Trunk
With yarn E, ch 30.
Row 1 (RS) Dc in 4th ch from hook, dc in each ch across—28 dc. Fasten off and leave a long tail for sewing. Sew the tree trunk to the tree top.
Large Flower
With yarn B, make a magic ring.
Round 1 (RS) Ch 1, 8 sc in ring, sl st in first sc to join— 8 sc.
Round 2 Ch 1, sc in first sc, ch 4, (sc, ch 4) in each sc around, ending with ch 2, hdc in first sc instead of last ch-4 lp (this will put yarn in the correct position for the next round)—8 ch-4 lps.
Round 3 Ch 1, sc in first lp, ch 4, (sc, ch 4) in each ch-4 lp around, sl st in first sc to join—8 ch-4 lps.
Round 4 *(Sc, hdc, 3 dc, hdc, sc) in next ch-4 lp (shell made), sl st in next sc; repeat from * around, sl st in first sl st to join—8 shells. Fasten off. Weave in the ends.
Pointed Flower Tree:
Tree Top
With yarn C, work same as Large Flower Tree Top through Round 4.
Fasten off. Weave in the ends.
Tree Trunk
With yarn E, ch 28.
Row 1 (RS) Dc in 4th ch from hook, dc in each ch across—26 dc.
Fasten off and leave a long tail for sewing. Sew the tree trunk to the tree top.
Pointed Flower
With yarn D, ch 8 and join with a sl st to form a ring.
Round 1 (RS) Ch 1, 12 sc in ring, sl st in first sc to join—12 sc.
Round 2 Ch 1, (dc, tr) in first sc, picot, (tr, dc, ch 1, sl st) in next sc, *(sl st, ch 1, dc, tr) in next sc, picot, (tr, dc, ch 1, sl st) in next sc; repeat from * around, sl st in first stitch to join—6 picots. Fasten off and leave a long tail for sewing. Sew the flower to the center of the tree top. Weave in the remaining ends.
Small Flower Tree:
Tree Top
With yarn A, work same as Large Flower Tree Top through Round 3.
Fasten off. Weave in the ends.
Tree Trunk
With yarn E, ch 19.
Row 1 (RS) Dc in 4th ch from hook, dc in each ch across—17 dc.
Fasten off and leave a long tail for sewing. Sew the tree trunk to the tree top.
Small Flower
With yarn C, make a magic ring.
Round 1 (RS) Ch 1, 8 sc in ring, sl st in first sc to join—8 sc.
Round 2 Ch 1, sc in first sc, ch 4, (sc, ch 4) in each sc around, sl st in first sc to join—8 ch-4 lps.
Fasten off and leave a long tail for sewing. Sew the small flower to the center of the tree top. Weave in the remaining ends.
Ringed Wreath Tree:
Tree Top
With yarn B, work same as Large Flower Tree Top through Round 3.
Round 4 Ch 2 (counts as hdc), hdc in next dc, *2 hdc in next dc, hdc in each of next 2 dc; repeat from * around, ending with hdc in each of last 2 dc, sl st in beginning ch to join—40 hdc.
Fasten off. Weave in the ends.
Tree Trunk
With yarn E, ch 21.
Row 1 (RS) Dc in 4th ch from hook and each ch across—19 dc.
Fasten off, leaving a long tail for sewing. Sew the tree trunk to the tree top.
Ringed Wreath
Note: Wreath is worked in a straight line. Sew the crocheted line together at the short ends to form a circle.
Round 1 (RS) With yarn A, *ch 3, 4 sc in 2nd ch from hook; repeat from * 6 times, ch 3, 8 sc in 2nd ch from hook. Working across opposite side, sl st in 8th sc from hook, **sl st in next sc, 4 sc in 2nd ch of next ch-3, sk 2 sc from opposite side and sl st in next sc, repeat from ** across row, ending with sc in first ch of round.
Fasten off, leaving a long tail for sewing, and sew ends of trim together to form a circle. Sew the wreath to the center of the tree top. Weave in the remaining ends.
Finishing:
Place the assembled trees on the tote as shown in the photograph, or as desired. Pin tree tops in place. With thread to match each tree and trunk you are attaching, hand-sew the tree top, and then the trunk, in place. Work from the inside of the bag and make stitches small so they are well concealed by the yarn, being careful not to accidentally stitch through both sides of the bag.
مع تمنياتي لكم بالمتعه والفائده ...........